Web Authentication
From version 5.0 of Sym3, authentication can be achieved through the two methods;
Project
In this mode the Project runs as stand-alone with no external connections, relying upon the internal User access to authenticate users and their privileges.
Web Authentication
When the Web Authentication service is installed, the Web page allows three methods for authenticating users.
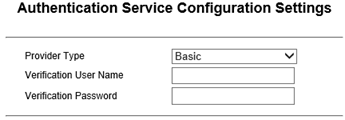
1 - Basic Authentication
The simplest form of Authentication.
Select the ‘Basic’ option from the ‘Provider Type’ drop-down box in the ‘Authentication Server’ screen.

The screen options that need to be set are:
| Name | Description |
|---|---|
| Provider Type | Selected ‘Basic’ |
| Verification User Name/Verification Password | Optional. This is the User Name and password that provides access to these Web pages and could be the same as the User and password you used to access this page but often a separate user/password combination. |
| Save | Save the settings |
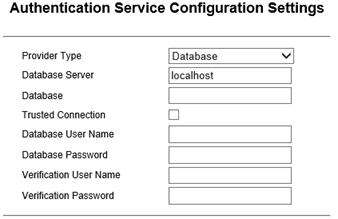
2 - Database Authentication
Allows a Server host (SQL), Database name, connection User and Password to be specified. The Authentication validates against entries in this database.
Select the ‘Database’ option from the ‘Provider Type’ drop-down box in the ‘Authentication Server’ screen.

The screen options that need to be set are:
| Name | Description |
|---|---|
| Provider Type | Selected ‘Database’ |
| Database Server | Database server name |
| Database | Database name |
| Trusted Connection | Default = disabled Enable this if you are using a trusted connection to the database and a User Name/Password for the database is not required. |
| User Name/Password (If ‘Trusted Connection’ is disabled) | The User Name and password that allows access to the specified database. |
| Verification User Name/Verification Password | This is the User Name and password that provides access to these Web pages and could be the same as the User and password you used to access this page but often a separate user/password combination. |
| Save | Save the settings. |
Active Directory Domain Authentication
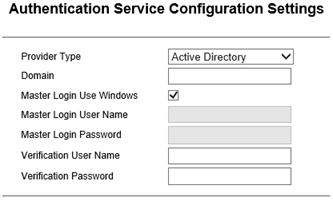
Uses Active Directory to manage users, roles and permissions.
This document details the configuration to enable and support Authentication via Active Directory.
Note: The installation of an Active Directory Server is outside the scope of this documentation and you should contact an IT professional to set up and configure this.
Select the ‘Active Directory’ option from the ‘Provider Type’ drop-down box in the ‘Authentication Server’ screen.

The screen options that need to be set are:
| Name | Description |
|---|---|
| Provider Type | Selected ‘Active Directory’ |
| Domain | The Domain name for the Active Directory server |
| Master Login Use Windows | If ticked, the system will use your Windows login for the Active Directory login. If ‘Master Login Use Windows’ is disabled (not ticked) then there are options for; |
| Master Login User Name/Password | This is the Active Directory User Name/Password login. If you enter a User Name and Password combination and forget it then you will no longer have access to the Active Directory. You should contact your Active Directory Administrator to regain access or have this reset. |
| Verification User Name/Verification Password | This is the User Name and password that provides access to these Web pages and could be the same as the User and password you used to access this page but often a separate user/password combination. |
| Save | Save the settings. |
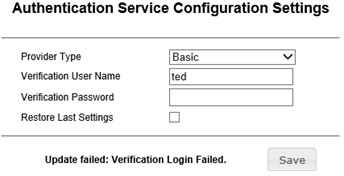
When the settings are saved, the Authentication server is automatically restarted and an attempt to login using the supplied User Name and password is made. If this attempt fails then the error message is displayed and the option ‘Restore Last Settings’ will be presented.

This allows the restoration of the previous settings and avoid a situation where the user is locked out due to an invalid User Name/Password combination.