Alarms
Alarms are used to link Tag values to messages to indicate a change to the user.
An Alarm instance is triggered if its condition is true. When the condition is true, the alarm is ON or active. When the condition becomes false, the alarm is OFF or inactive.
An alarm can be Acknowledged at any time once triggered.
The alarm condition is based on a tag value, or an expression of tags. Using expressions allows creation of complex alarm triggers based on multiple tag values, or to prioritize certain tag over others.
Alarms are stored in the configured database. The amount of alarms, the number of day of retention is configurable (See “Server Settings”)
The total number of alarms that the client can retrieve from the server is limited. The value (default 10,000 alarms) can be configured per client in the client configuration (See “Client Settings”)
Create a new Alarm (+)
New Alarms can be created in Sym3 using the Alarm Manager that can be accessed by: Ribbon > Home > Alarms
Clicking on + creates a new Alarm with a default name (Alarm1) in the Alarm Manager Panel. Double-click on this name to change it. This name has to be unique in this list.
Delete an Alarm (-)
Open the Alarm Manager, select the entry to be deleted and click on -
A confirmation screen will appear, ensure this is the correct Alarm and click Yes to delete it.
Delete all Alarms (-*)
Pressing this button prompts the user that they will be deleting all Alarms. A Yes response removes all Alarms from the list. This is most often used to clear all Alarms before a re-import to update some changes.
Import Alarms
Opens a file open window that should be browsed to a suitable CSV Alarm import file. If any inconsistencies or errors are encountered then these appear in a window and no Alarms are imported.
Export Alarms
Opens a file open window that should be browsed to a suitable location to save the CSV Alarm export file. You can export invalid or faulty Alarms.
Search
The Search field offer a filter such that only Alarms matching the filter are displayed in the list. To see all Alarms, ensure this field is empty.
Alarm Properties
Each of the Alarm fields displayed in the Alarms Manager Panel are:
| Name | Description |
|---|---|
| Name | Unique name of the alarm (used for search/filter). Must be unique. |
| Primary Tag | Tag name to evaluate (left-hand side). Should exist in the Tags Panel (not hard-validated on save). |
| Compare With | Right-hand side selector: Threshold (numeric) or Secondary Tag (tag-to-tag comparison). |
| Operator | Comparison operator applied as `PrimaryTag (Operator) (Threshold SecondaryTag). Typical: ==, !=, >, >=, <, <=. For text, use ==/!=`. |
| Threshold | Numeric value used only when Compare With = Threshold. Ignored otherwise. |
| Secondary Tag | Tag name used only when Compare With = Secondary Tag. Should exist in the Tags Panel (not hard-validated). |
| Priority | Select from Alarm Priorities Panel. Lower numbers = higher priority (affects ordering/escalation). |
| Enabled | When true, the alarm is evaluated. When false, the definition is stored but not evaluated (useful for staging/suppression). |
| Displayed | Default = true. Controls whether the alarm is shown in UI/feeds. Does not affect evaluation. |
| Message | Text shown when the alarm is active. Supports tag placeholders like {{TagName}}, replaced at runtime.Example: Right Clamp failed; Code={{RightClamp.ErrorCode}}. |
| Equipment | Optional equipment/equipment type for grouping/filtering. Example: Clamp/Right, RobotCell-A. |
| Audio | Optional link to an entry in the Audios panel; played when the alarm is raised (client/config dependent). |
| Enabled Alarm Message Map | When true, use Alarm Message Map to choose a message based on the Primary Tag value. If false, use Message. |
| Alarm Message Map | Map PrimaryTagValue → Message. When a value matches, the mapped message replaces Message. Placeholders ({{TagName}}) are supported in mapped messages. |
| Down Time | If true, counts toward system availability / downtime KPIs in reports. |
| Comment | Optional notes for operators/admins (reasoning, links, dependencies). |
Editing an Alarm
Click on the Property Editor option in the Ribbon bar to open the Property Editor Panel.
Either select an entry from the Alarms Panel or, from the Project Explorer panel, select Data Sources
The settings for the Data Source will appear in the Property Editor Window and allow changes to its properties.
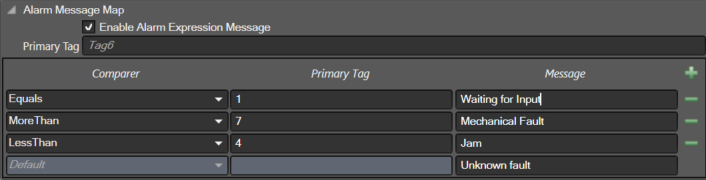
Alarm Message Map
The Alarm Message Map feature allows you to display custom messages based on the value of the Primary Tag. To enable this functionality, select “Enabled Alarm Message Map.”
To map a custom message, populate the grid control with the expected primary tag value, the message to display, and the comparer. The displayed message will be the first entry that evaluates to true in the order they are listed.
If the default message is left empty and no entries evaluate to true, the alarm definition message will be used instead.
Import/Export file structure
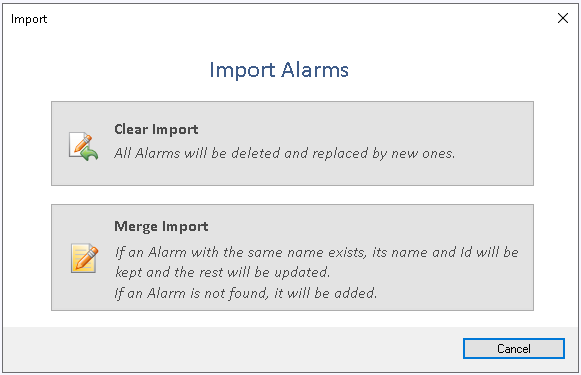
There are three options while importing alarms
- Clear Import: All Alarms will deleted and replaced by new ones.
- Merge Import: If an Alarm with the same name exists, its name and Id will be kept and the rest will be updated. If an Alarm is not found, it will be added.
- Merge and Clean: If an Alarm with the same name exists, its name and Id will be kept and the rest will be updated. If an Alarm is not found, it will be added. If an Alarm is not in the import, it will be removed.
The Alarm file for both Export and Import should have a CSV structure similar to:
Name,Primary Tag,Compare With,Operator,Threshold,Secondary Tag,Priority,Enabled,Displayed,Message,Equipment,Audio,Comment,Down Time,Alarm Message Map

Alarm1,Tag3,Threshold,Equal,1,Tag1,,1,1,Warn,,,,,
Alarm2,Tag1,Threshold,Equal,1,,,1,1,,,,,,