Toolbox
The toolbox is used to create new equipment in the project.
The toolbox contains 3 tabs:
- Generic: Standard equipment and MyEquipment,
- Automation : Automation Types
- Shapes : A library oh 3D shapes.
The toolbar of the toolbox (located on top) works for all those tabs:
- Expand all: Expand all sections to display all the equipment.
- Collapse all: Collapse all sections so only the section headings are visible.
- Search: Filter the equipment in the list by name. e.g. entering “group” (not case sensitive) will only show the “Handler Group” and Screening Operator Group" in the Toolbox. Clear the Search field to see all items in the Toolbox.
How to use
- Just click and drag an equipment icon to the 3D view to add the selected equipment to the project.
- Drag and drop a conveyor on another conveyor to automatically ‘snap’ the conveyor to the existing one.
- Drag and drop a PE Sensor on a conveyor to automatically place it on the conveyor.
- Drag and drop a Product schedule on a conveyor to create a new Product schedule on this conveyor.
Generic Tab
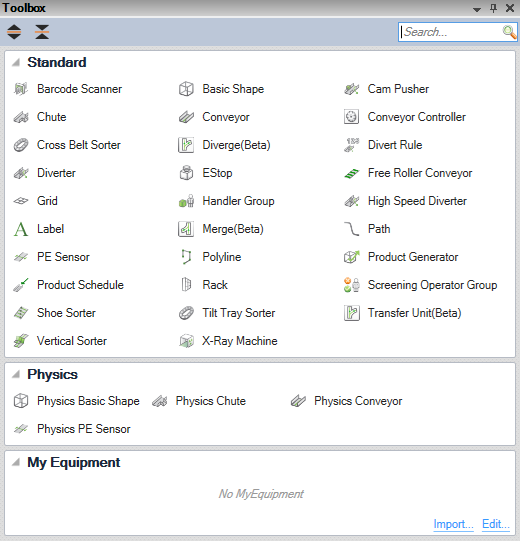
The Toolbox is divided into groups:
Standard
The standard supported equipment that can be used in a project.
Physics
Integrator only.
Equipment that is simulated using a physics simulation.
My Equipment
This section contains all your Custom equipment (called My Equipment) created for this project (they are saved in the project).
On the header of this group, click the 3 dots button to access the option menu:
- Edit…: To open the My Equipment Editor to add/delete/rename your custom equipment
- Import…: To import one or more My Equipment from another Sym3 project.
Controls
Operator only.
In Sym3 Operator Editor, when editing a Window, the tool box will automatically change to display the available 2D Controls you can use for a Window.
Automation Tab
New in Sym3 v10.2.2
The Automation tab contains macros (written in javascript) that can be dropped directly into the 3D view. It can be used to:
- automate the creation of equipment
- create a group of equipment. For example: A conveyor with a Photo-Eye and a Label
- execute some actions on an existing equipment in the 3D view
- and more….
These macros are using the exact same API as standard macros but have extra properties that can be used (listed below).
Just like other equipment in the toolbox, you can drag an automation item from the toolbox (mouse left-click + mouse move) and drop it into the 3D View. The macro will be executed when you release the mouse left button and those following properties will be passed to the macro:
| Property Name | Type | Description |
|---|---|---|
Sym3DropX |
Double | The X coordinate in the 3D view under the mouse (when the left button was released) |
Sym3DropY |
Double | The Y coordinate in the 3D view under the mouse (when the left button was released) |
Sym3DropZ |
Double | The Z coordinate in the 3D view under the mouse (when the left button was released) |
Sym3DropEquipment |
Object | The equipment object under the mouse (when left button is up). If no equipment, the value will be null. |
Sym3DropEquipmentName |
String | The equipment name under the mouse (when left button is up). If no equipment, the value will be null. |
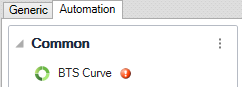
Location of automation macros
Automation macros are organized by libraries. A library is simply defined by:
- A name: the name that will appear in the toolbox,
- A folder path: the location on the disk where the macros are located.
You can:
- Create as many libraries as you want,
- Rename an existing library,
- Remove an existing library: the folder on the disk and its content is NOT deleted by Sym3,
- Open the containing folder where the macros are located.
Adding, deleting or renaming a macro: Sym3 doesn’t need to be restarted. Any modifications in the above folders should be automatically reflected in the toolbox.
The configuration of those libraries is saved in a settings file located here C:\Users\xxx.yyy\Documents\Sym3 Common\toolbox.settings.xml. Please note that these settings are shared across all three products (Designer, Integrator and Operator Editor).
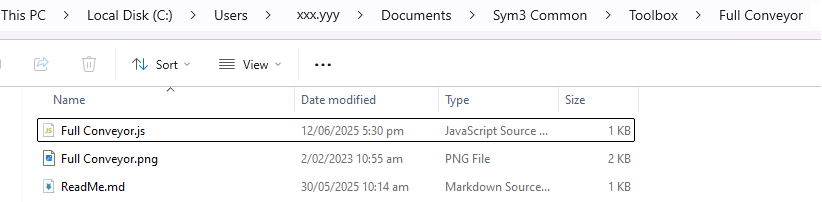
Creation of automation macros
- An automation macro is written using the JavaScript language and saved in one of the above folders with the extension
.js, - Optional: An image (.png) with the same name as the JavaScript file can be saved in the same location. If this image is available, it will be used as icon in the toolbox. We recommend an image of 32x32 pixels.
- Macros can be saved in sub-folders
Checking for errors
Sym3 has an integrated mechanism that checks if a macro has errors. If this is the case, an error icon will be displayed on the right side on the Name.
Example
The following macro will create a conveyor along with a Label, an E-Stop and a Photo-Eye. The macro is using those special properties to position the Conveyor or connect it to an existing Conveyor
//-- create a conveyor and connect it to equipment under the mouse (if any)
var c = Project.Equipment.NewConveyor(Sym3DropEquipment);
c.Length = 4;
c.LeftSidePanelVisible = false;
c.RightSidePanelVisible = false;

//-- set position
if(Sym3DropEquipment == null)
{
    c.X = Sym3DropX;
    c.Y = Sym3DropY;
    c.Z = Sym3DropZ;
}

//-- create a Label
var label = Project.Equipment.NewLabel()
label.Parent = c;
label.Text = c.Name;
label.CharacterHeight = 0.5;
label.X = 0.1;
label.Y = 0.8;
label.Z = 0;

//-- create an EStop
var estop = Project.Equipment.NewEStop()
estop.Parent = c;
estop.ScaleX = 0.35;
estop.ScaleY = 0.35;
estop.ScaleZ = 0.35;
estop.X = 0.2;
estop.Y = -0.83;
estop.Z = -0.2;
Shapes Tab
New in Sym3 v10.2.2
The Shapes tab contains your .obj (wavefront) 3D files.
When a Shape is dropped in the 3D view:
- A Shape is automatically created if it was not present in the project already.
- A Basic Shape is automatically created at the mouse position.
- The Basic Shape is set to Custom and the Shape is automatically set to the one selected.
This is a quick and easy way to create custom objects.
Location of shapes
Shapes (.obj files) are organized by libraries. A library is simply defined by:
- A name: the name that will appear in the toolbox,
- A folder path: the location on the disk where the files are located.
You can:
- Create as many libraries as you want,
- Rename an existing library,
- Remove an existing library: the folder on the disk and its content is NOT deleted by Sym3,
- Open the containing folder where the .obj files are located.
The files located in those folders are NOT saved in the Sym3 project until there are actually used by the project. This allows the user to have a big list of predefined models to use (Planes, tanks etc…) and use them if required.
Adding, deleting or renaming an .obj file: Sym3 doesn’t need to be restarted. Any modifications in the above folders should be automatically reflected in the toolbox.
The configuration of those libraries is saved in a settings file located here C:\Users\xxx.yyy\Documents\Sym3 Common\toolbox.settings.xml. Please note that these settings are shared across all three products (Designer, Integrator and Operator Editor).